One of the biggest struggles I had creating videos with my iPhone was getting the lighting right. For one year I shot videos using tungsten standing lamps shining on one of the walls of my home office. The feedback I often received from others was that the video background looked washed out or the subject was not clearly illuminated.
I finally decided to purchase a 3-point lighting kit as a Christmas present to myself and with some help from Jules, author of the iPhoneVideo Hero Course I was able to create an Apple White Background.
Here are the 3 main benefits for creating a white video background
1. Sets the tone for your video
A black background suggests a more serious tone whereas a white one suggests a more up-beat and happy tone.
2. Prevents washed out look
I’ve tried a multitude of colored backgrounds however white makes the subject stand out because there’s no color distracting the viewer. As a web designer I always recommend using black text on a white background because it makes the text easy to read.
3. Makes text and images pop
Adding text boxes or images to your videos makes them stand out when placed on a white background. It also reduces the time for optimizing images as you don’t have to remove the background color to blend with the background of your video. I just use them as is.
Equipment needed
Lighting Kit
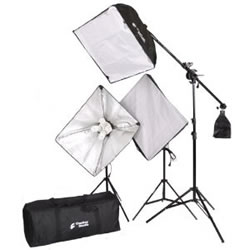
I purchased a 3 point Cowboy lighting system from Amazon for $180.00. If you get the kit from Cowboy Studio you’ll pay $215.00 so use this link to save $35.00.
Here are the features of the lighting kit:
- Two (2) Top Quality Light Stands and Boom Kit with Grip Head
- Two (2) 20″ x 28″ Softbox and Two (2) 4 Light Sockets
- One (1) Quick-Setup Softbox with AC Socket
- Eight (8) 45 Watt Photo Bulbs and One (1) 105 Watt 5 Photo Bulb
- One (1) Padded Carrying Case for the Whole Package
White backgound
I hung a large white bed sheet on the wall then ironed out the creases (unless you want to see them on your video). Alternatively use a white wall by painting one of the walls of your office white. You can also purchase white/black muslin backdrops or use a large white paper background.
Room to set-up your lighting kit
Initially I was going to use a corner of my office and paint one of the walls white however there wasn’t enough room to set-up all the lights so I selected a corner of my basement.
Note: You need more room to create an Apple White Background because the background zone needs to be separate from the zone where your subject is being lit.
Editing software
I use Screenflow because I purchased a Mac Book Air primarily for editing videos and received a $100.00 coupon with the purchase. I directly import, edit and export all my iPhone videos with it plus it’s very user friendly.
How to set-up your lighting studio
To achieve the Apple White background you need a ton of light. If the lighting kit you bought still doesn’t provide enough light just add some additional lights to flood the background.
- Shine your 2 most powerful lights on the white background
- Shine the third light on the subject by placing it directly above the camera
- Move a couple of feet away from the backdrop so the subject is lit separately
- Place your camera a few feet in front of the subject
- The camera lens should be aligned with your eyes so you’re not looking down on your audience
- To eliminate any shadows under your chin use a white board or white reflector (I hold this while I’m filming)
Edit your video
After importing my video into Screenflow it usually isn’t pure white yet so you need to adjust the brightness, contrast and saturation controls to get it just right.
If you’re not using Apple white backgrounds for your videos yet consider purchasing the 3-point lighting kit to give your videos a more professional look.
Watch how my lighting kit is set-up and how to edit your video
Are you currently using white backgrounds in your videos?
Are there additional tips you want to add?
Feel free to post your feedback in the comments below.

